F.E.T Basic Guide (v.5.11), updated November 2009
Time-tabling is a complex and challenging task, as anyone will appreciate who has spent frustrating hours of the day or night forever shuffling oblong scraps of paper around on the floor. FET makes this onerous task a lot easier and, crucially, flags up ‘conflicts’ before it is too late and your teachers or students find out the hard way!
It is necessarily a complex program to master (but then, so is learning to walk, or ride a bike). FET will prove well worth the effort required. Here is a revised draft of some basic instructions to get you started. (I’m a teacher, not a professional timetabler!)
- You have downloaded a zipped file of approx 8mb. I recommend that you store this on your Desktop.
- Click on it to unzip it. You will end up with a FET folder containing several files, again ideally stored on your Desktop.
- The most important file is the program itself, fet.exe
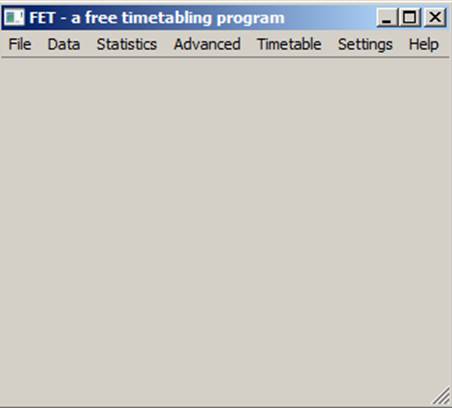
- Click on this file and a small window, your main screen, will open (Screen 1a). I shrink it to Screen 1b size, drag it to a top corner of my screen and park it there all day.

Screen 1a Screen 1b
Enter the Data
- First you need to enter some data … so click on “Data”. A drop-down menu opens (Screen 2):
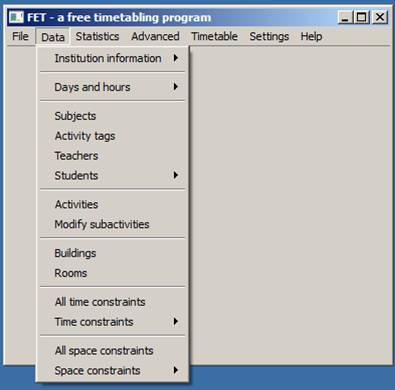
Screen 2
- Select “Institution information” and complete those brief details if desired.
- Next select “Days and hours”, then “Days per week” (See Screen 3a and 3b)
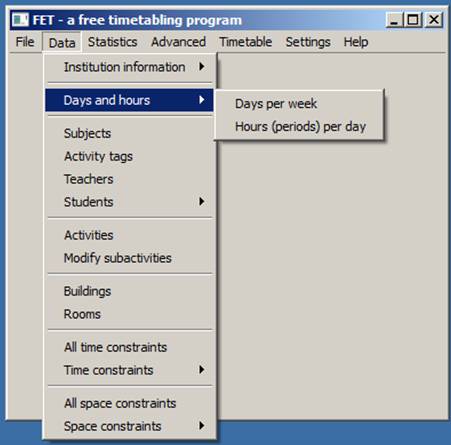
Screen 3a Screen 3b
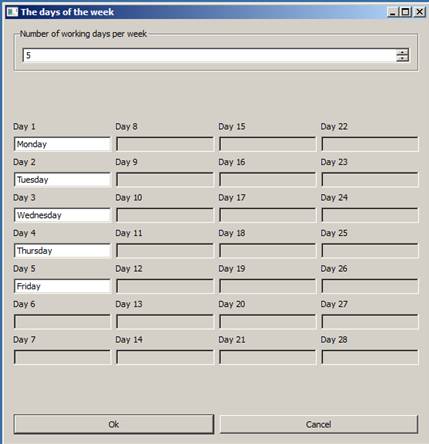
- Five days are selected by default; you can alter this simply by adjusting the number at the top of the window. Click OK when ready.
- Next click on “Hours (periods) per day”. You will find 12 selected by default as in Screen 4a but you can alter this by adjusting the number at the top again. Click OK when completed – these hours will be printed on the timetables you produce. (For my College timetable I typed in the hours as shown below in Screen 4b because this suits my situation.):
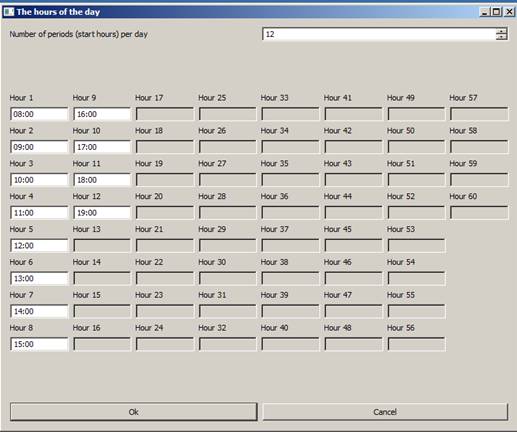
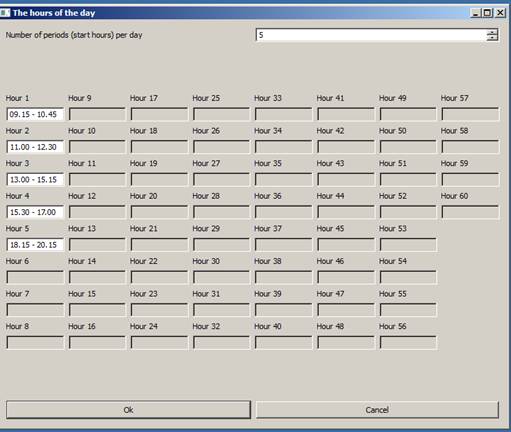
Screen 4a Screen4b
6. Click “Subjects”. Type in the name and click “Add”. Repeat until you have several or all of your subjects added.
Before closing, “Sort alphabetically”. See the screenshot of my subjects below (Screen 5):
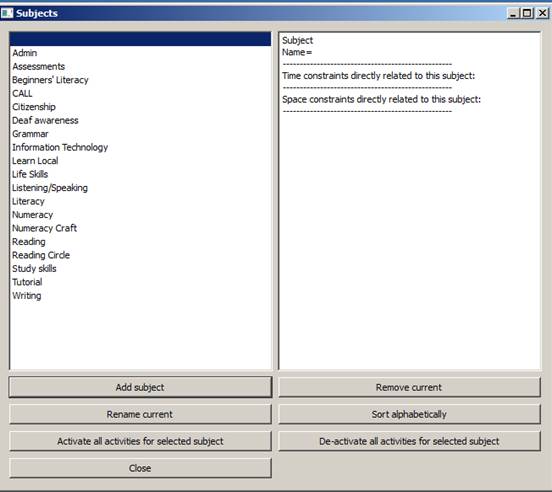
Screen 5
7. Next click on “Teachers” and add just a few names; you can add the rest later. Click OK. Close when finished.
- Now click on “Students”. You must add at least one year in order to proceed. I called my year “2009 - 2010” and made the number of students 300…… see Screen 6 below. To complete adding the year, click “Add”. “Close” when finished. You can highlight and modify or remove a year if necessary.

Screen 6
- Next click Students/“Groups”. A new window opens. Highlight the year then click “Add group”. My groups are ability groups; E0 (Entry 0) are beginners and L2 (level 2) are very advanced students. But in a Primary School for example, the groups might be 6 year olds, 7 year olds, 8 year olds etc. (See below after I’ve added several groups - Screen 7):
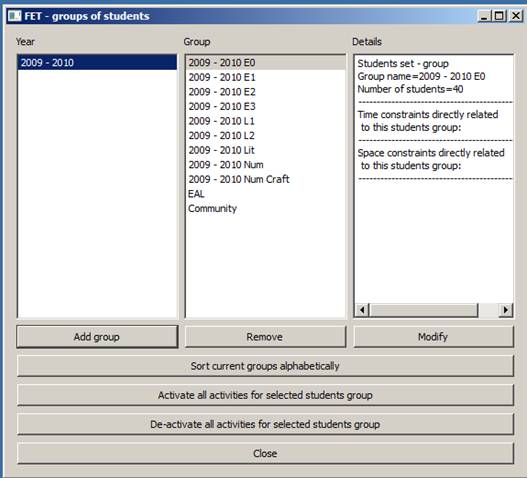
Screen 7
- Click
Students/“Sub-groups” this time. My E0 group contains 40 students, divided
into four teaching groups or classes, as you can see below, screen 8. The
four main subgroups I have named E0 F/T (containing 15 students), E0A, E0B
and E0C. In a Primary School the 6 year olds might be sub-grouped into
just two teaching groups or classes; likewise the 7 year olds etc. The
terminology – years, groups, subgroups may be different in your situation;
you may not even use “subgroups” at all if your group numbers are small.
But the concepts are universal and you need to apply them to your own
situation.
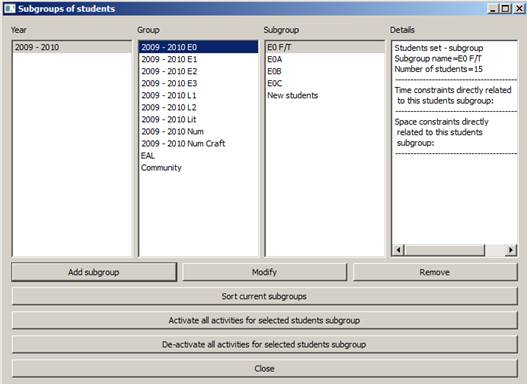
Screen 8
Highlight each group in turn, click on “Add subgroup”, give it a name and type the number of students in it if desired. Finish by clicking “Add”. Repeat the process until you have added several subgroups (or classes). I have sorted my subgroups alphabetically (a very useful button!):
- The final essential data to be entered is “Rooms”. Click on this, type in the room name, type (eg. ‘gym’) and capacity, click “Add” and then repeat the process to add a few more rooms. “Close” to finish.
ASSEMBLE THE DATA
Now that we have some basic data to work with, we can begin to construct lessons or “Activities” in FET terminology.
- Click on “Activities”, then on “Add” in the new window that opens; your screen will now look similar to Screen 9 below:
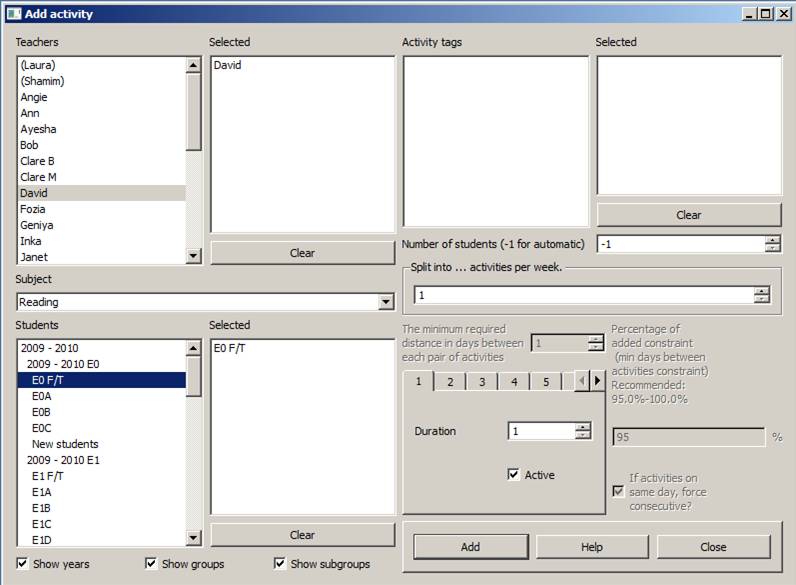
Screen 9
- a. Double-click a teacher (or more than one if required in the room for that lesson). The teacher(s) will appear in the big “Selected” box, (as David does above).
b. Select a subject from the
drop-down list. (I have selected
c. Double-click a group or subgroup from “Students” (you may need to tick “Show subgroups” first). They appear in the “Selected” box (E0 F/T selected above)
Finally click on “Add ” at the bottom right of the window. You can unselect a teacher or students by double-clicking them in the selected boxes
- Repeat the steps a-c in 2 above, to create a few lessons or “Activities” as required for your establishment. Finally click “Close”.
The process above is repetitive. It can be speeded up if you have identical lessons to be repeated several times per week, for example a daily period of English (double-length on two days for good measure!)
- Start with Screen 9. On the right, above the numbered tabs 1 to 5, you can choose to 'Split into .... activities per week'. Make it 5, for this example.
- Move down a little and leave 'The minimum required distance in days between each pair of activities' as 1.
- Now move down a little and change 'Duration' to 2.
- Move to the numbered tabs. Click on 1; you have just created a 'double-length' lesson.
- Click on tab 2 next and create another 'double-length' lesson. (Duration will need to be changed to 2 again)
- That's enough double-length lessons for one week. Duration can be left at 1 for the next three lessons.
- End by clicking "Add current activity", OK it and close. You have just created five lessons, two of them double-length.
- I would recommend that at this stage if you have not already done so, you click “File” and then “Save as”, giving your data-file an appropriate name, so that your hard work so far is safe and never has to be re-typed!
LET ‘FET’ GENERATE A TIMETABLE
- On your main screen, click “Timetable” then “Generate new”. A new window opens as below, Screen 10a:
- Click “Start” and FET will begin to count down rapidly, creating timetables for teachers, subjects, rooms, students, days and times.
After a minute or less, the display will stabilize, hopefully showing zero conflicts of space or time, as in screen 10b
- Click “OK” and “Close”.
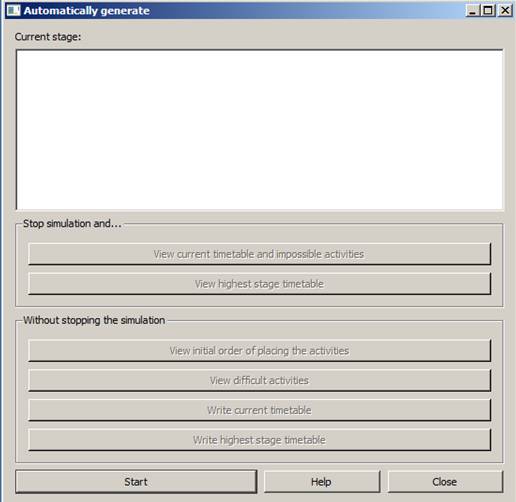
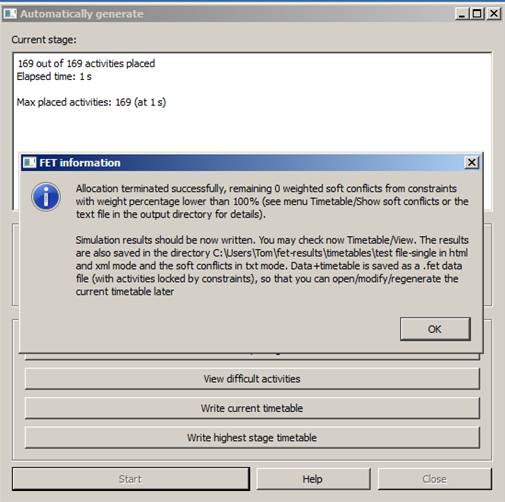
Screen 10a Screen 10b
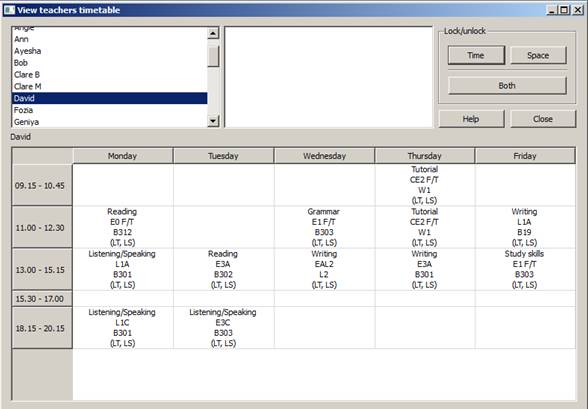
- Let’s look at the exciting outcomes! On the main screen click “Timetable” then “View teachers”. A list of your teachers will appear. Click on a teacher and their timetable is displayed, as David in Screen 11a below:

Screen 11a Screen
11b
Click on any box within that timetable (screen 11b above) and its details will be displayed at the top, including a specific “Id number” for that lesson, a very useful FET identifier that will be referred to later on. (If you are copying from an existing timetable, I strongly recommend that you pencil in this Id number in the relevant slot of that old timetable – it will save a lot of time later).
PRINT YOUR TIMETABLE
Your teachers and students are unlikely to be interested
in the fascinating details of all you have done so far. They will just want
error-free print-outs!
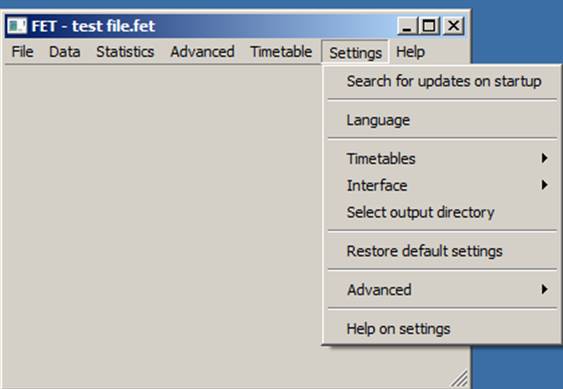
1. On your main screen click “Settings” then “Select output directory”
Screen 12a Screen 12b
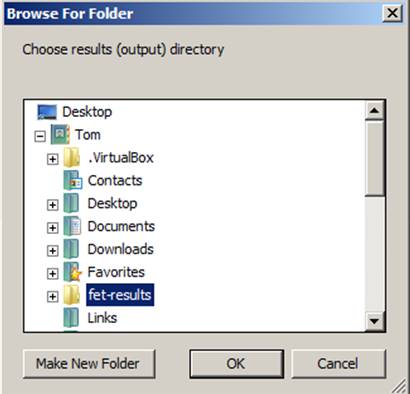
- Note in 12b above that my timetables are stored on the Desktop, in a sub-folder called “fet-results” inside a folder called “Tom”. Take your time to understand this; you can of course make a new folder or choose to store them somewhere else. Notice that “fet-results” has a + sign before it? Let’s open it.
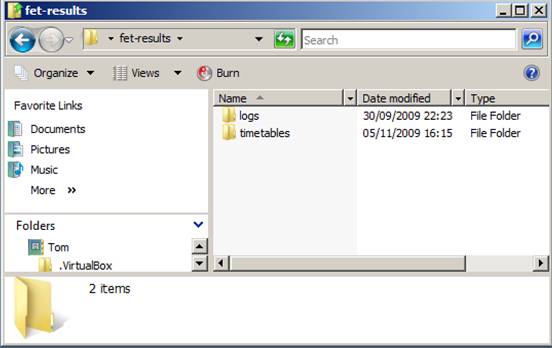
- I open “Tom” on my Desktop, then “fet-results” then “timetables” as in screens 13a and 13b below
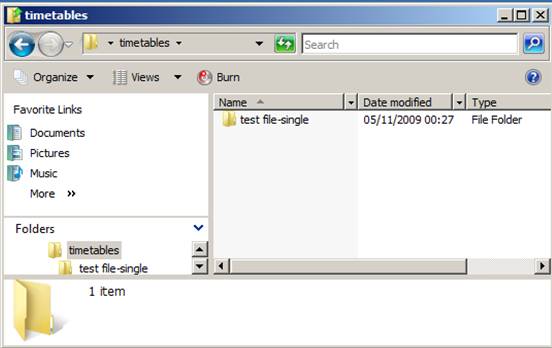
Screen 13a Screen 13b
- Finally I open “test file-single”…see below screen 13c
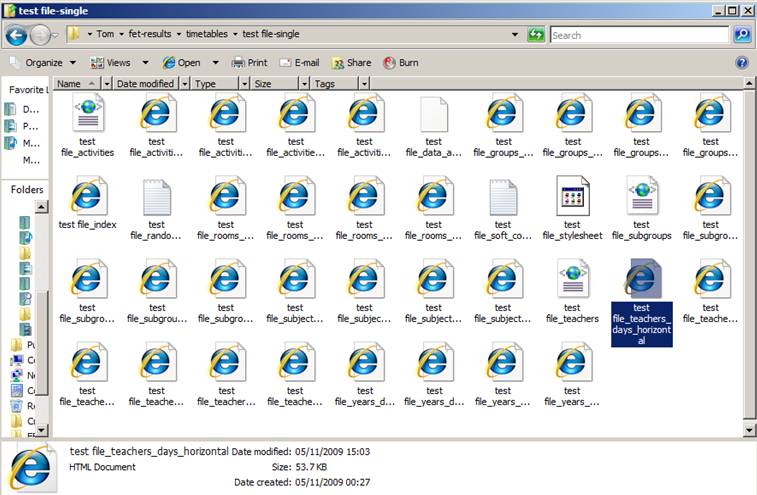
Screen 13c
Numerous timetables can be printed, (with the option to print the days horizontally or vertically….etc). Take time to examine each one and you’ll find many to meet your needs. I have high-lighted one html file in “test file-single” above, and then selected to actually print just one small part of it (David, of course.. see below!). You can print the whole file, or use your mouse to highlight just one timetable and simply print that selection. You can also copy the selection and paste it into a word processor or spreadsheet for additional formatting before printing. (I am assuming you know how to ‘select’ and then ‘print selection’ etc):
|
|
David |
||||
|
Monday |
Tuesday |
Wednesday |
Thursday |
Friday |
|
|
09.15 - 10.45 |
--- |
--- |
--- |
CE2 F/T Tutorial W1 |
--- |
|
11.00 - 12.30 |
E0 F/T
B312 |
--- |
E1 F/T Grammar B303 |
L1A Writing B19 |
|
|
13.00 - 15.15 |
L1A Listening/Speaking B301 |
E3A
B302 |
EAL2 Writing L2 |
E3A Writing B301 |
E1 F/T Study skills B303 |
|
15.30 - 17.00 |
--- |
--- |
--- |
--- |
--- |
|
18.15 - 20.15 |
L1C Listening/Speaking B301 |
E3C Listening/Speaking B303 |
--- |
--- |
--- |
|
|
Timetable generated with FET 5.11.0 on 05/11/2009 15:03 |
||||
|
|
|
||||
Screen 13d
Congratulations! You have just completed the basic steps to produce an individual teacher’s timetable using FET. You can go back to any of the data entry menu items you have visited so far and modify the data you entered, or add more data to extend your timetable. If you do so, first save your new file then ‘generate’ again and inspect your latest timetable, (no need to print it until you are fully satisfied with it - see Screen 12 above when we looked at David, before we went to ‘fet-results’ folder and finally printed it).
I find that each teacher and each student needs a timetable of their classes; each room needs a room-timetable displayed on the door. In the staffroom I place three large spreadsheet-like displays of all teachers, all classes and all rooms …. FET provides all these but over several sheets of A4 so there is some scissor-work and gluing to do.
In the following section, I look at other options in the FET menu, which enable varying degrees of control of the final timetable …. you can allow FET total freedom, (ie. 0% control by you), as we just did above, or you can constrain it in varying degrees up to 100%. Even in this latter case FET still serves as a powerful database storing all your timetable data, enabling you to modify, interrogate or view it on screen with a few mouse clicks, as well as print out a variety of consistent and up-to-date timetables.
Introduction to ‘Constraints’
If you have persevered through the exercise this far, you now have a timetable and can peruse it or print it out from many different viewpoints. But it is unlikely to be fully satisfactory in the way it has allocated teachers, students, rooms, days or times. You may at this stage, as I did, want to see if FET can produce a timetable identical to the old existing one in your institution. It can, with the repeated use of just two ‘constraints’, one of ‘time’ and the other of ‘space’.
You can apply time and space constraints to each activity and then FET will adhere to them, (unless you are asking it to do something impossible). Look at Screen 15 below:
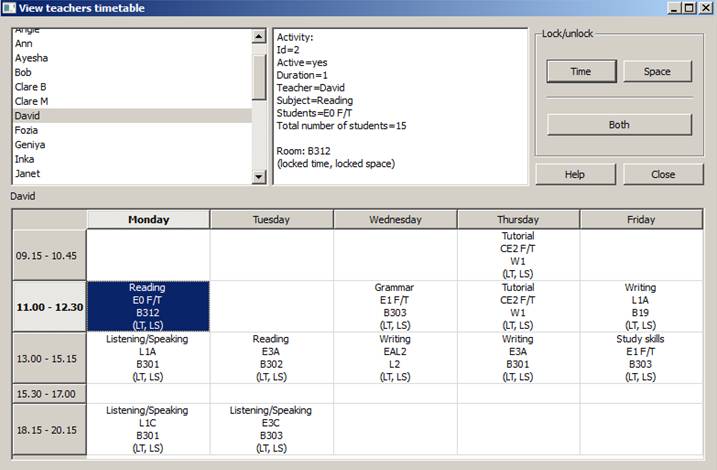
Screen 14
It is the same as screen 11b. Details of the highlighted activity are displayed in the top right section of the window. Teacher is David, subject is Reading, students are E0 F/T, Id number is 2, and it must be Monday 11.00 – 12.30, must be in room B312 (both Time and Space are ‘locked’… LT and LS). Here’s how I chose the time:
- Main screen …. click Data, then ‘Time constraints’, then ‘Activities’, then ‘An activity has a preferred starting time’
- Screen 15a below appeared, empty because I had not yet added any time constraints. So I clicked ‘Add’. Screen 15b appeared and I made changes…

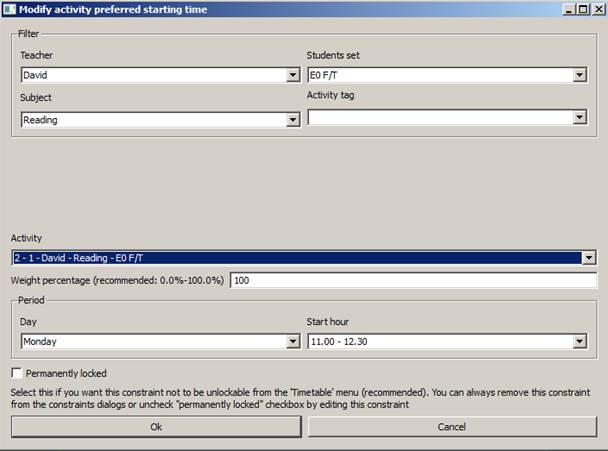
Screen 15a Screen 15b
- I clicked the drop-down arrow in each little box, ensuring that they were as shown in Screen 15b and then clicked ‘Ok’
- I then invested a lot of time examining every time-slot in my entire FET timetable, teacher by teacher, and constrained them as in points 1 – 3 above, forcing them to match the time-table I was copying. It was a lengthy process but only needed to be done once (and ‘saved’ of course!). My FET data now matched the old existing timetable, time-wise.
- Remember, whenever you add a new activity in future, you will probably need to repeat steps 1 – 3 above.
- When you need to alter an existing time constraint in the future, the process is ‘Data’, ‘All time constraints’, highlight the one you want to change and then ‘modify’.
Go back now and look at Screen 14 again, focussing on ‘Room’ (bottom of window)
Yes, it’s Room B312, because I chose that room. Here’s how I did it:
- Main screen …. click Data, then ‘Space constraints’, then ‘Activities’ then ‘An activity has a preferred room’. Screen 16a below opens. Click ‘Add’ to get screen 16b ….
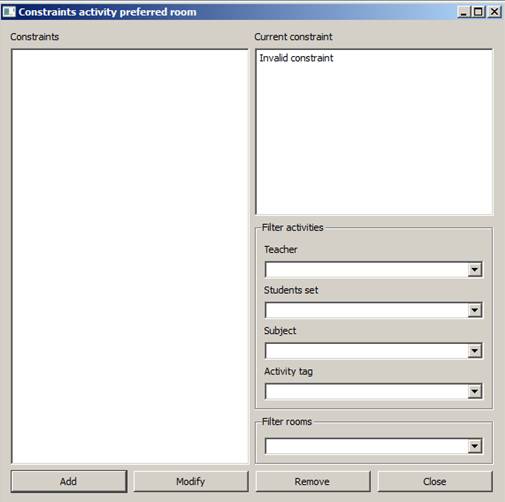
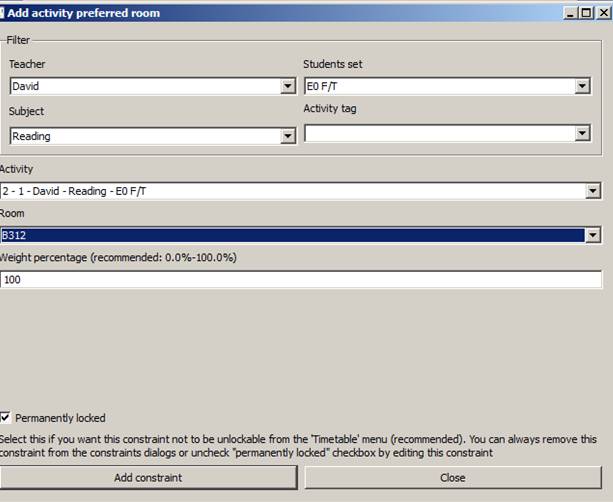
Screen 16a Screen 16b
- Use the drop-down menus to ensure that the correct teacher, students, subject, room etc are displayed.
- When you are satisfied, click ‘Add constraint’ and ‘Close’
- Repeat steps 3 and 4 above to add space more constraints.
- The left-hand window will fill up, as mine below (Screen 17)
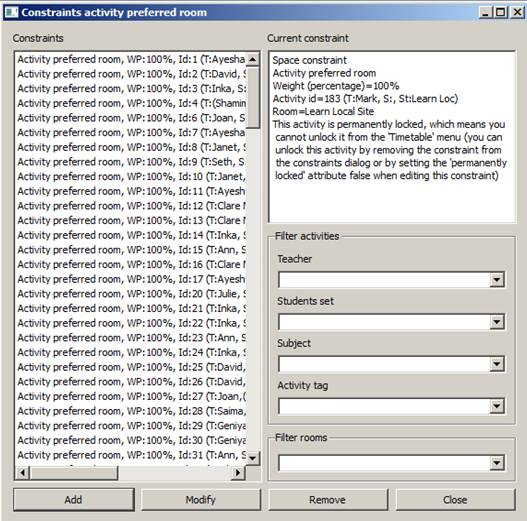
Screen 17
- I invested a lot of time to examine every space-slot in my entire FET timetable, teacher by teacher and activity by activity, and constrained them as in points 1 – 7 above, forcing them to match the old time-table I was copying. It was a lengthy process but only needed to be done once (and ‘saved’ of course!). My FET data, I hoped, now matched the old existing timetable, space-wise.
- When you need to alter an existing space constraint in the future, the process is ‘Data’, ‘All space constraints’, highlight the one you want to change and then ‘modify’
Handling Conflicts
One of the many advantage of using FET for your time-tabling, is its flagging up of ‘conflicts’ or time-tabling clashes, where for example you have double-booked a room, a teacher, a set of students etc. When time-tabling by hand it is easy to miss these problems, with embarrassing consequences ‘on the ground’ later on. FET always spots them.
You will be very lucky indeed (or a very clever timetabler) if FET runs quickly and produces your timetable without conflicts. Conflicts arise when you ask FET to do the impossible – a set of students or a teacher in two places at once for example, or a room too small for the class. It can be very puzzling initially as to what exactly the problem is. I recommend that you make a habit of generating a new timetable regularly after entering just a very small amount of new data. It generates almost instantaneously, or fails and then you know the problem is related to the last data you entered.
Why not experiment with a tiny practice file? Create a new FET file called ‘Practice’ for example, with just three teachers, three student groups, three rooms, three subjects. Set up just three ‘activities’ and generate a timetable. FET will spread the activities over the week. Now add just two constraints of space and two constraints of time, forcing two activities into the same room at the same time. Generate again and watch the results of the conflict you have created. Go back and adjust the constraints to remove the conflict and then generate again. You could also try putting a teacher, or a set of students, in two places at the same time. I have found that practising like this helped me resolve problems with my real timetables.
Screen 18a below is the result of a space conflict that I deliberately created, using a tiny file practice file. The computer paused there so I clicked ‘View current timetable and impossible activities’. .. see screen 18b
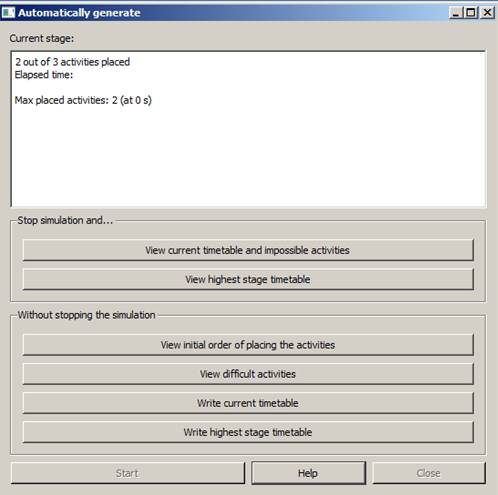
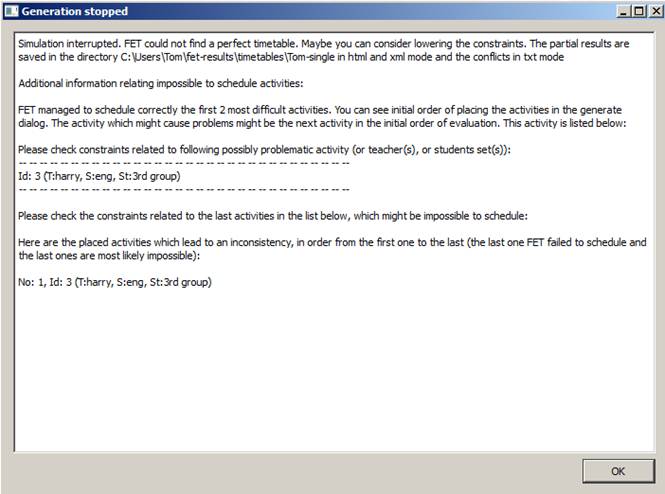
Screen 18a Screen
18b
The problem is that activity Id:3 is trying to go in the same room at the same time as activity Id:2 or Activity Id:1. Now screen 18b might lead you to think that the problem and the solution rest with teacher Harry and Id:3. But in fact there is more than one way to resolve it – I could move Id:3 to a different room or I could leave Id:3 as it is and move Id:2 or Id:1 instead, leaving the room free for Harry. FET will not, and could not be expected to, make such professional decisions for you, the human time-tabler when you ask for the impossible.
Conclusion
I hope you found this basic guide useful in getting you started. If so, you will realise of course that there are several aspects of FET that I have not dealt with. However, there are many sources of help available on the FET website and the user forum at http://www.lalescu.ro/liviu/fet/. Happy time-tabling!
WRITTEN BY Tom Hosty, 5 November 2009 Email: tomhosty@hotmail.com
You can email me directly to comment on this Guide or for support … I’ll do my very best to help. All feedback is welcome, but especially constructive criticism. Like FET itself, this aims to be an evolving Guide, updated as often as necessary to make it as useful as possible.